Monday, January 18, 2021

A Recipe...Mostly for me so that I don't forget it

Not the greatest presentation, but it tasted really good. 

So I made a dish tonight for dinner that I want to write down somewhere so that I don't forget it.

I cooked a boneless, skinless chicken thigh by this recipe: https://www.thespruceeats.com/chicken-breasts-in-parchment-paper-479485. Only used salt, pepper, and the lemon (not sure if it added anything to the taste in the end). Need to cook it for 20-30 minutes to make it more tender. 20 minutes is enough, but the thigh won't be that tender.

In a separate parchment pouch, put some cauliflower and grated carrots. Drizzle with a little oil. Place in oven for 20 minutes. Stagger with the chicken if necessary.

Once all in the oven, make a half-recipe worth of this teriyaki sauce: https://www.tasteandtellblog.com/teriyaki-chicken/. Add equal amounts of brown sugar and honey (an addition to the recipe). The honey is needed to add more sweetness, which I feel the original recipe is lacking. Also add red pepper flakes.

When the chicken is done, shred it or cut it into small pieces. Toss everything together.

This would go really well with steamed rice.

Sunday, October 25, 2020

The Necklace


The Necklace cowl is inspired by and is in honor of US Supreme Court Justice Ruth Bader Ginsburg. I was devastated by her passing, so I channeled those feelings into something positive, constructive, and creative. 

Tapestry crochet is na easy way to do colorwork in crochet. All of the stitches of the cowl are single crochet (double crochet in UK terminology) in the back loop, along with chains and slip stitches when rounds are started and joined. Both colors are carried together. While a single crochet is made in one color, the other color is stitched around and hidden in the middle of the stitch made. In this pattern, the contrast color is joined in on Round 4. 

The examples given in the pattern as well as the yardage and dimensions are for a cowl made with 13 repeats of the chart.

Check out this video for a really good tapestry crochet tutorial.

YARN:

  • Worsted weight
    • I have made this in two different types of worsted weight yarn. The amounts are given below with approximately 20% overage.
      • Red Heart With Love
        • Main Color (MC): 140 yd (130 m)
        • Contrast Color (CC): 100 yd (90 m)
      • Berroco Ultra Wool
        • MC: 160 yd (145 m)
        • CC: 75 yd (70 m)


HOOK:
  • G or H hook
    • A G hook works well for thinner worsted weight yarn (e.g. Ultra Wool).
    • An H hook works well for thicker worsted weight yarn (e.g. Red Heart).
GAUGE:
  • Gauge is not too important for this project. But here is the gauge for each of the yarns I used::
    • Red Heart With Love (H hook)
      • In the pattern worked in the round, 2"x2" = 9 sc x 7 rows
    • Ultra Wool (G hook)
      • In the pattern worked in the round, 2"x2" = 11 sc x 9 rows
DIMENSIONS:
  • Red Heart With Love
    • When laid flat, 19" (48 cm) long by 7.25" (18.5 cm) wide
  • Ultra Wool
    • When laid flat, 15.5" (39.5 cm) long by 5.5" (14.5 cm) wide
ABBREVIATIONS:
  • Sc - Single crochet
  • BLO - Back loops only
  • Ch - Chain
  • Sl st - Slip stitch
  • St/sts - Stitch(es)


PATTERN:

Some notes:
  • Begin the chart at the bottom right corner (if you are left-handed, use the second chart and start at the bottom left corner).
  • Repeat the pattern as many times as desired. The examples shown here use 13 repeats of the chart.
  • Begin every round with a Ch 1. This does not count as the first stitch of the round.
  • The first sc of each round will be made into the stitch that was slipped to in the previous round.
  • End each round by joining with a sl st to the first sc in the round. Be careful with this. This may require a color change in some rounds. When you are joining with the sl st, it may be best to slip into both loops of the sc instead of just the back loop.
  • After the first round, all single crochets are worked in the back loop only.
  • I will provide some written direction to get you started.
Beginning with MC only, ch 156 (or a multiple of 12 if increasing or decreasing the number of chart repeats). Sl st to join to the first ch st. Be careful to not twist the foundation chain.

Round 1. Ch 1. Sc in each ch (including the ch slipped to) around. Join to first sc with a sl st.
Round 2. Ch 1. Sc in BLO in each st around. Join to first sc with a sl st. 
Round 3. Ch 1. Sc in BLO in each st around. Join to first sc with a sl st. 
Round 4. Ch 1. Join CC yarn (hold in back and stitch around it to hide it). With MC, sc in BLO in first 3 sts. *With CC, sc in BLO in next st. With MC, sc in BLO in next 11 sts. Repeat from * around to the last 8 sts. With MC, sc in BLO in last 8 sts. Join to first sc with a sl st.

From here, follow the chart below, starting with row 5.

Right-handed Chart:

Left-handed Chart:

Cheers!


Thursday, July 30, 2020

Spiralis Scarf

My Spiralis Hat is gaining new life right now (July 2020). Shortly after I posted the pattern in January 2017, I started working on an accompanying scarf pattern. I put the project down for three years, but given the current state of the world, I've gotten back to it and can post the pattern now. :) 


MATERIALS:
    -Bulky weight yarn
        -Alternatively, two DK weight yarns held together will also work.
    -US 9 circular or straight needles
    -Tapestry needle to weave in ends.

YARN YARDAGE SUGGESTION:
    -Bulky weight yarn: Allow for approx. 175 yds per 30" of scarf
    -Two DKs held together: Allow for approx. 350 yds per 30" of scarf

ABBREVIATIONS:
    -K - knit
    -P - purl

PATTERN:

Cast on 30 stitches


Straight Section

Row 1. Knit across. Turn.

Row 2. P2, *K2, P2. Repeat from * to end. Turn.

Repeat Rows 1 and 2 until straight section measures approximately 3 inches long. End with Row 1.


Spiral Section
Row 1. K1, *P2, K2. Repeat from * until last stitch. P1 in last stitch. Turn.

Row 2. K across. Turn.

Row 3. K2, *P2, K2. Repeat from * to end. Turn.

Row 4. K across. Turn.

Row 5. P1, *K2, P2. Repeat from * until last stitch. K1 in last stitch. Turn.

Row 6. K across. Turn.

Row 7. P2, *K2, P2. Repeat from * to end. Turn.

Row 8. K across. Turn.

Repeat Spiral Section Rows 1-5 one more time. Spiral Section should measure 1.5-2.0 inches.


Repeat Straight Section then Spiral Section as many times as needed to reach desired length. End with a Straight Section and ending this section on Row 1. Break yarn. Secure yarn. Weave in ends.


Cheers!

Sunday, May 10, 2020

Ottellea

Happy Mother's (and Grandmother's) Day!!


This is Ottellea. It is named after my grandmother's middle name and the first name of my great grand-aunt (although a slight spelling variation).

This is Grandma Irene Ottilie in 1946. She was 22 years old in this photo.

The pattern is available for purchase at the following sites:

Ravelry pattern page
Love Crochet pattern page

Here are some details about the pattern:

Yarn: Fingering weight
MC (block sections) - approximately 600 yds
CCA (bobble sections) - approximately 460 yds
CCB (three mesh sections) - approximately 220 yds
CCC (two mesh sections) - approximately 120 yds
[Note: If you want to use three colors instead of four, combine the estimated yardage of CCB and CCC.]

Approximate Dimensions: 80" along the longest side by 30" at the widest point. Your finished dimensions may differ depending on your gauge and how the finished scarf is blocked.

Even though the pattern uses simple stitches, such as sc, sc2tog, dc, and dc2tog to mention a few, I would say this pattern would be for an experienced beginner or an intermediate crocheter. The reason behind this is you will need some familiarity with finding stitches at the end of each row. That is probably the trickiest part of the pattern.

 
This one is the Floral Ottellea. The yarns I used are as follows:
[Dyer, Base, Coloway]
MC - Shalimar, Aerie, Chamois
CCA - Knerd String, Fingering Weight, Cherry Garcia
CCB - Avalon Springs Farm, Pendragon, Hobbit House
CCC - Shalimar, Breathless, Enchanted

I call this one the Autumnal Ottellea. This was actually the first color scheme I used, but I didn't like how the pattern was turning out at the time, so I frogged it. I rewrote the pattern, made the Floral one, and then remade the Autumnal. Here are the yarns:
MC - Tempting Ewe; Ewe So Happy Sock; Lock, Shock, & Barrel
CCA - Hazel Knits, Entice MCN, Hoppy Blonde
CCB - Hazel Knits, Entice MCN, Concord
CCC - Hazel Knits, Entice MCN, Sedge

Some of the yarns I used are from Maryland local dyers: Avalon Springs Farm (find their yarn at local events and on their website), Tempting Ewe (exclusive to Clover Hill Yarn Shop in Catonsville, but also online), and Shalimar (see her website for stockists).

Happy crocheting!!

Sunday, April 26, 2020

Super Bulky Basket Weave Hat

Hi everyone!

Some time ago, I was perusing Ravelry for a super bulky knitted hat pattern. I found this one from Yarnspirations, but I didn't like that it is worked flat and then seamed.

I adapted Yarnspirations' pattern to make a similar one that is worked in the round.


Super Bulky Basket Weave Hat


YARN: Super bulky yarn, approximately 4 oz, or approximately 90 yds, in total.
Main Color (MC): approximately 60 yds
Contrast Color (CC): approximately 30 yds

GUAGE: 1” x 1” – 4 sts x 3 rows, in rib pattern (relaxed, not stretched)

NEEDLES:
US 11 circular needles
US 13 circular needles
US 13 double-pointed needles

STITCH ABBREVIATIONS:
  • K – Knit
  • P – Purl
  • Ktbl – Knit through the back loop
  • SSP – Slip, slip, purl (decrease)
  • SSK – Slip, slip, knit (decrease)
  • P2tog – Purl two together (decrease)
  • K2tog – Knit two together (decrease)

STARTING with US 11 circular needles
Using the MC, cast on 54 stitches using a stretchy cast on. Join in circle, being careful not to twist stitches. Place marker. Move the marker as the work progresses keeping the first stitch of the round in the same position.

Stitch K1 P1 ribbing for 2 inches, or the desired length of the brim.

SWITCH to US 13 circular needles
1.     Change to CC. *(Ktbl, P1) 4 times. Ktbl. P9. Repeat from * around.
2.     *(Ktbl, P1) 4 times. Ktbl. K9. Repeat from * around.
3.     Repeat rounds 3 and 4 four more times.
4.     Change to MC. *P9. (Ktbl, P1) 4 times. Ktbl. Repeat from * around.
5.     *K9. (Ktbl, P1) 4 times. Ktbl. Repeat from * around.
6.     Repeat rounds 6 and 7 four more times.

SHAPING the crown (switch to US 13 double-pointed needles when necessary):
7.     Change to CC. *(Ktbl, P1) 4 times, Ktbl, SSP, P5, P2tog. Repeat from * around.
8.     *(Ktbl, P1) 4 times, Ktbl, SSK, K3, K2tog. Repeat from * around.
9.     *(Ktbl, P1) 4 times, Ktbl, SSP, P1, P2tog. Repeat from * around.
10.  Change to MC. *SSP, P5, P2tog, Ktbl, P1, Ktbl. Repeat from * around.
11.  *SSK, K3, K2tog, Ktbl, P1, Ktbl. Repeat from * around.
12.  *SSP, P1, P2tog, Ktbl, P1, Ktbl. Repeat from * around.

Break the yarn and run it through the remaining stitches. Pull tight to secure and weave in the ends. Attach a pompom if desired.

Cheers!

Saturday, April 25, 2020

Grandma's One Egg Cake Recipe

Hi everyone!

I want to share another one of my grandmother's dessert recipes. Like her butter cookie recipe, we don't know where she got this one from. I'm not going to lie. This is not the most spectacular vanilla cake I've ever had. But if you have limited ingredients, it works well.


One Egg Cake


½ stick of butter
½ cup sugar
1 cup flour (sifted 3 times)
2/3 cup milk
1 egg
1 tsp vanilla
¼ tsp salt
2 tsp baking powder
Sprinkles (optional)
  1. Grease or butter a 8" x 8" cake pan. Add parchment paper to the bottom of the pan if desired. (This will help with removal of the cake.)
  2. Cream butter and sugar until light and fluffy.
  3. Sift flour 3 times with baking powder and salt.
  4. Add egg to butter/sugar mix. Beat well.
  5. Add flour alternating with milk, beat well after each addition.
  6. Add vanilla.
  7. [Optional] Fold in sprinkles for a confetti cake.
  8. Transfer to the pan and bake at 350F for 20-25 minutes or until a cake tester (e.g. knife, toothpick, piece of uncooked spaghetti, etc) comes out clean.
  9. Once cooled, remove from the pan and add icing if desired.
For the cake I made in the picture, I used the Quick and Almost-Professional Buttercream Icing recipe from All Recipes. It was quick and easy, which was what I needed when I made the cake.

Cheers!

Friday, April 24, 2020

Pittsburgh Series 3: Oakmont Hat

This is the last hat in my three-hat Pittsburgh series. It uses the inter-cable sections of each of the previous two hats, Bridgeville and Tonidale.

The hats are named after three of my favorite local yarn shops in the Pittsburgh area. The pattern is not made in conjunction with the shop. It is more in homage to the shop.
--------------
Love Knitting Pattern Page
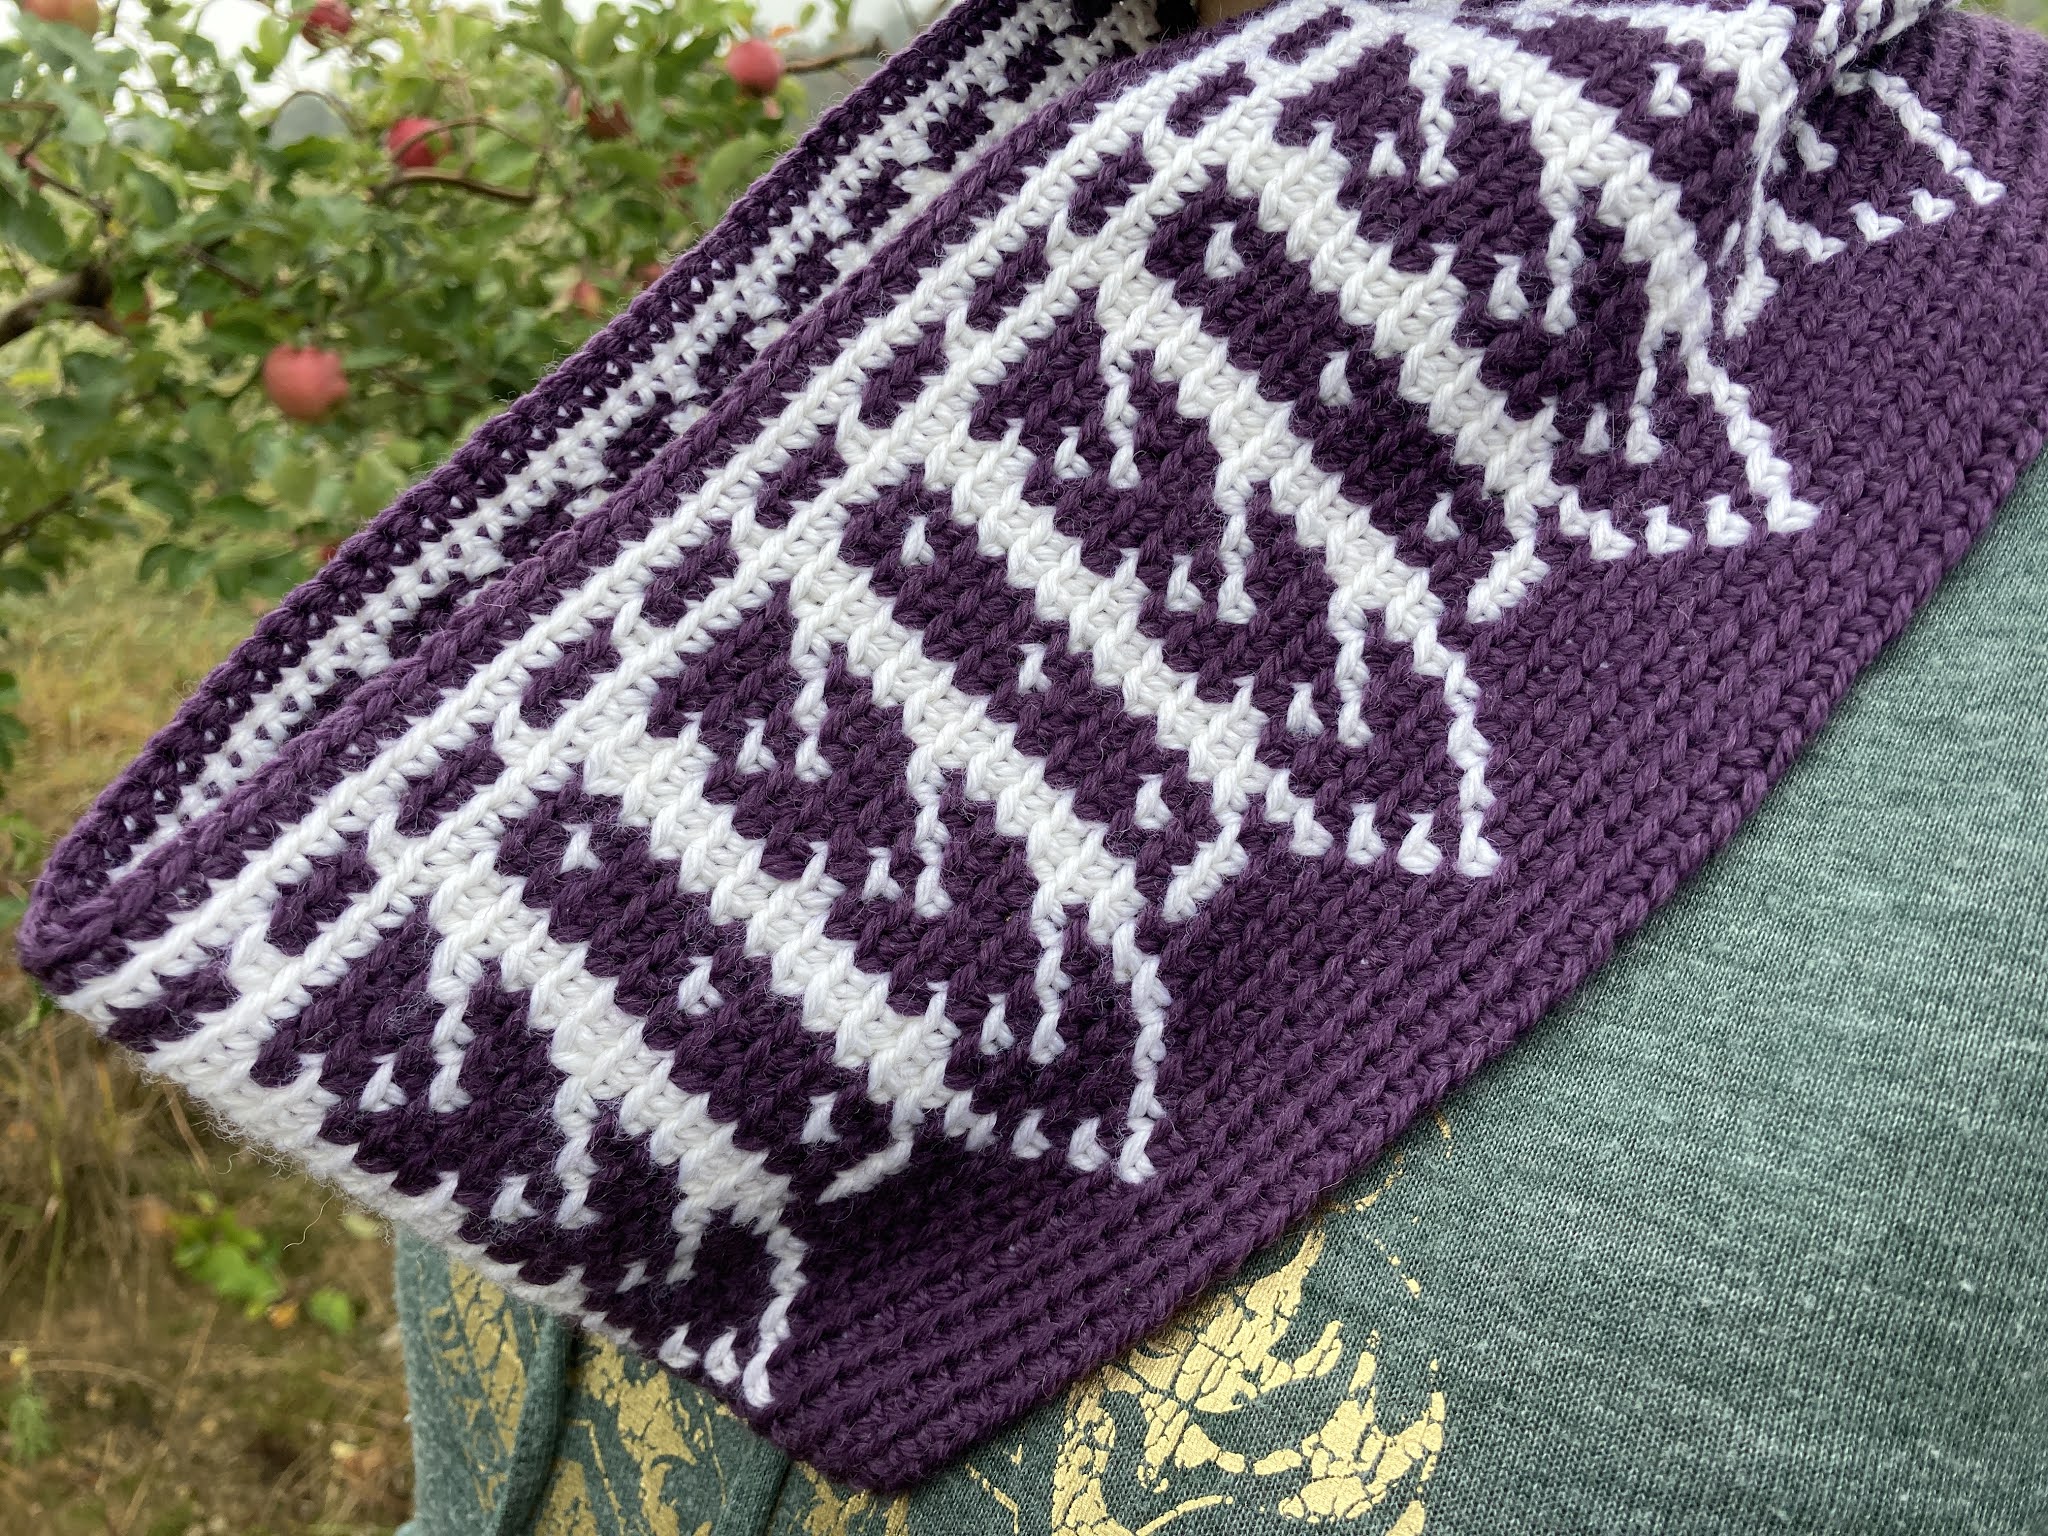

Oakmont Hat

By Felicia Kulp

YARN: Worsted weight, approximately 90 grams or 180 yards

GAUGE: 1” x 1” – 8 sts x 7 rows, in K2P2 (relaxed, not stretched)

NEEDLES:
  • US 5 circular needles
  • US 7 circular needles
  • US 7 double-pointed needles
  • Cable needle

STITCH ABBREVIATIONS:
  • K – knit
  • P – purl
  • C2F – move 1 stitch to the cable needle, hold in front, knit 1 from left needle, knit stitch on cable needle.
  • C2B – move 1 stitch to the cable needle, hold in back, knit 1 from left needle, knit stitch on cable needle.
  • SSK – slip slip knit
  • K2tog/K3tog – knit two/three stitches together
  • P2tog/P3tog – purl two/three stitches together

STARTING with US 5 circular needles
Cast on 120 stitches using a stretchy cast on. Join in circle, being careful not to twist stitches. Place marker. Move the marker as the work progresses keeping the first stitch of the round in the same position.

Stitch K2 P2 ribbing for 2-3 inches, or the desired length of the brim.

SWITCH to US 7 circular needles
Round 1: *K2, P5, K2, P2, K2, (P1 K1 P1 K1 P1 K1 P1), K2, P2. Repeat from * around (4 more times).
Round 2: *C2F, K5, C2B, P2, C2F, (K1 P1 K1 P1 K1 P1 K1), C2B, P2. Repeat from * around (4 more times).

Repeat rounds 1 – 2 until hat measures 8 to 9 inches (or the desired length of the hat minus approximately 2 inches [shaping the crown will be about 2 inches in length]), ending with Round 2.

SHAPING the crown (switch to US 7 double-pointed needles when necessary):
Round 1: *K2, P2tog, P1, P2tog, K2, P2, K2, (P1 K1 P1 K1 P1 K1 P1), K2, P2. Repeat from * around.
Round 2: *C2F, K3, C2B, P2, C2F, (K1 P1 K1 P1 K1 P1 K1), C2B, P2. Repeat from * around.
Round 3: *K2, P3tog, K2, P2, K2, (P1 K1 P1 K1 P1 K1 P1), K2, P2. Repeat from * around.
Round 4: *C2F, K1, C2B, P2, C2F, (K1 P1 K1 P1 K1 P1 K1), C2B, P2. Repeat from * around.
Round 5: *SSK, P1, K2tog, P2, K2, (P1 K1 P1 K1 P1 K1 P1), K2, P2.  Repeat from * around.
Round 6: *K3, P2, C2F, (K1 P1 K1 P1 K1 P1 K1), C2B, P2. Repeat from * around.
Round 7: * K3tog, P2, K2, (P3tog K1 P3tog), K2, P2. Repeat from * around.
Round 8: *P3, C2F, (K1 P1 K1), C2B, P2. Repeat from * around.
Round 9: *P1, P2tog, K2, P3tog, K2, P2tog. Repeat from * around.
Round 10: *P2, C2F, K1, C2B, P1. Repeat from * around.
Round 11: *P2, SSK, P1, K2tog, P1. Repeat from * around.
Round 12: *P2, K3, P1. Repeat from * around.
Round 13: *P2tog, K3tog, P1. Repeat from * around.

Break the yarn and run it through the remaining stitches. Pull tight to secure and weave in the ends. Attach a pompom if desired.

Cheers! Happy knitting!