Showing posts with label child. Show all posts

Friday, September 10, 2010

Child Version of the Waffle Stitch Hat

Photo by mcm, ravelry.com
Since the Waffle Stitch Hat pattern has been posted on Ravelry, Kym (mcm), a crocheter and knitter on the site, has created a child's version of the hat. 


Pattern (Thanks to Kym!):


Row 1. Ch 11. Dc in third ch from hook. Dc across. Ch 2. Turn.
Row 2. Dc in first st. *Dc in next st, fpdc in next 2 sts. Repeat from * twice more. Dc to end. Ch 2. Turn.
Row 3. Dc in first st. *Fpdc in next st, dc in next 2 sts. Repeat from * twice more. Fpdc in next st. Dc in last st. Ch 2. Turn.
Repeat Rows 2 and 3 until piece has 13 completed waffle squares and 2 half squares (i.e. the first row and the last row). End with Row 2 and ch 1 instead of ch 2. Fold the piece in half so that the first row is next to the last row (with the waffle pattern facing out). Slip st together each st of the first row and the last row. Ch 2 at the end. Do not turn.

Shaping the Top
My hat
Round 1. Dc 42 sts evenly across the top of the waffle stitch base. This roughly correlates to 3 sts per waffle square. Join with sl st to first dc st of round. Join in this way throughout the rest of the piece. Ch 2. Do not turn.


Round 2. Dc in st that was slipped to (start each round this way). Dc 1 in next 3 sts. Dc2tog in next 2 sts. *Dc 1 in next 4 sts, dc2tog in next 2 sts. Repeat from * around. Join. Ch 2.
Round 3. *Dc 1 in next 3 sts, dc2tog in next 2 sts. Repeat from * around. Join. Ch 2.
Round 4. * Dc 1 in next 2 sts, dc2tog in next 2 sts. Repeat from * around. Join. Ch 2.
Round 5. *Dc in next 1 sts, dc2tog in next 2 sts. Repeat from * around. Join. Ch 2.
Round 6. Dc2tog around. Join.
Fasten off. Weave yarn through last 7 stitches and pull tight to close the top of the hat. Weave in ends.

Monday, August 23, 2010

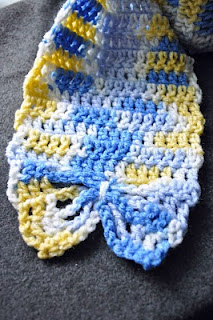
Butterfly Scarf

A couple days ago I found the Olivia's Butterfly hat pattern by Valerie Whitten. It is a very easy and simple child's hat pattern that is perfect for a young girl. However, the pattern, like the Cluster Stitch Cloche, didn't have a scarf to go with it. So again, I made my own, and here is the pattern. If you are having trouble with the stitch that goes around all of the chain rows, Mrs. Whitten has photos of that stitch in her hat pattern.


Pattern:
Materials:
1 skein worsted weight yarn (about 250 yds)
J hook


Row 1. Chain 19.
Row 2. Dc in third ch from hook. Dc in next 2 ch sts. Ch 10. Skip 10 ch sts. Dc in third ch st from the end of row 1. Dc to the end. Ch 2. Turn.
Row 3. Dc in  next 3 dc sts. Ch 10. Sk 10 ch sts (from row 2). Dc in next dc and to end. Ch 2. Turn.
Row 4 and 5. Repeat Row 3.
Row 6. Dc in next 3 dc sts. Dc in first 4 ch sts. Dc over and around all ch 10 rows by bunching the rows together. Sk 1 ch st. Dc in last 5 ch sts. Dc to end. Ch 2. Turn.
Row 7. Dc in each dc across. Ch 2. Turn.
Repeat Row 7 until scarf is 2 inches less than desired length.


Finishing
Row 1. Dc in first 3 dc sts. Ch 10. Sk next 10 dc sts. Dc in last 3 dc sts. Ch 2. Turn.
Row 2. Dc in first 3 dc sts. Ch 10. Sk next 10 ch sts. Dc in last 3 dc sts. Ch 2. Turn.
Row 3. Repeat Row 2.
Row 4. Dc in first 3 dc sts. Ch 10. Sk next 10 ch sts. Dc in last 3 dc sts. Ch 1. Turn.
Row 5. Sc in first 3 dc sts. Ch 5. Sc in 5th dc st of skipped dc sts from last row before Finishing rows, going around and bunching together all of the ch rows. Ch 5. Sc in next dc st and to end.
Finish off.