Showing posts with label crochet. Show all posts

Sunday, October 25, 2020

The Necklace


The Necklace cowl is inspired by and is in honor of US Supreme Court Justice Ruth Bader Ginsburg. I was devastated by her passing, so I channeled those feelings into something positive, constructive, and creative. 

Tapestry crochet is na easy way to do colorwork in crochet. All of the stitches of the cowl are single crochet (double crochet in UK terminology) in the back loop, along with chains and slip stitches when rounds are started and joined. Both colors are carried together. While a single crochet is made in one color, the other color is stitched around and hidden in the middle of the stitch made. In this pattern, the contrast color is joined in on Round 4. 

The examples given in the pattern as well as the yardage and dimensions are for a cowl made with 13 repeats of the chart.

Check out this video for a really good tapestry crochet tutorial.

YARN:

  • Worsted weight
    • I have made this in two different types of worsted weight yarn. The amounts are given below with approximately 20% overage.
      • Red Heart With Love
        • Main Color (MC): 140 yd (130 m)
        • Contrast Color (CC): 100 yd (90 m)
      • Berroco Ultra Wool
        • MC: 160 yd (145 m)
        • CC: 75 yd (70 m)


HOOK:
  • G or H hook
    • A G hook works well for thinner worsted weight yarn (e.g. Ultra Wool).
    • An H hook works well for thicker worsted weight yarn (e.g. Red Heart).
GAUGE:
  • Gauge is not too important for this project. But here is the gauge for each of the yarns I used::
    • Red Heart With Love (H hook)
      • In the pattern worked in the round, 2"x2" = 9 sc x 7 rows
    • Ultra Wool (G hook)
      • In the pattern worked in the round, 2"x2" = 11 sc x 9 rows
DIMENSIONS:
  • Red Heart With Love
    • When laid flat, 19" (48 cm) long by 7.25" (18.5 cm) wide
  • Ultra Wool
    • When laid flat, 15.5" (39.5 cm) long by 5.5" (14.5 cm) wide
ABBREVIATIONS:
  • Sc - Single crochet
  • BLO - Back loops only
  • Ch - Chain
  • Sl st - Slip stitch
  • St/sts - Stitch(es)


PATTERN:

Some notes:
  • Begin the chart at the bottom right corner (if you are left-handed, use the second chart and start at the bottom left corner).
  • Repeat the pattern as many times as desired. The examples shown here use 13 repeats of the chart.
  • Begin every round with a Ch 1. This does not count as the first stitch of the round.
  • The first sc of each round will be made into the stitch that was slipped to in the previous round.
  • End each round by joining with a sl st to the first sc in the round. Be careful with this. This may require a color change in some rounds. When you are joining with the sl st, it may be best to slip into both loops of the sc instead of just the back loop.
  • After the first round, all single crochets are worked in the back loop only.
  • I will provide some written direction to get you started.
Beginning with MC only, ch 156 (or a multiple of 12 if increasing or decreasing the number of chart repeats). Sl st to join to the first ch st. Be careful to not twist the foundation chain.

Round 1. Ch 1. Sc in each ch (including the ch slipped to) around. Join to first sc with a sl st.
Round 2. Ch 1. Sc in BLO in each st around. Join to first sc with a sl st. 
Round 3. Ch 1. Sc in BLO in each st around. Join to first sc with a sl st. 
Round 4. Ch 1. Join CC yarn (hold in back and stitch around it to hide it). With MC, sc in BLO in first 3 sts. *With CC, sc in BLO in next st. With MC, sc in BLO in next 11 sts. Repeat from * around to the last 8 sts. With MC, sc in BLO in last 8 sts. Join to first sc with a sl st.

From here, follow the chart below, starting with row 5.

Right-handed Chart:

Left-handed Chart:

Cheers!


Sunday, February 17, 2019

Two Tone Ribbed Winter Hat Pattern and Tutorial

About a month ago, I received an anonymous comment on my original Ribbed Winter Hat pattern asking how one would go about making the brim (the folded up part) a different color than the rest of the hat. I gave a written reply, but I don't know that it was the best I could have done. I decided to make a video tutorial for how to make a two tone Ribbed Winter Hat. 

Materials:
  • Worsted weight yarn 
  • K hook (However, depending on the yarn, sometimes the top of the hat [the part in the round] becomes rather open between stitches. If this occurs, switch to a smaller hook, like an I or H.)
The video below is probably the best way to work this pattern. If you would like an accompanying written pattern, it is below the video.

Feel free to let me know if anything is not clear. I don't mind revisiting the content of the video or the written pattern to clarify things. 

Link to Ravelry


Abbreviations:
  • Ch - chain
  • Sc - single crochet
  • st/sts - stitch/stitches
  • sc2tog - single crochet 2 together
  • BC - brim color
  • MC - main color
  • BLO - back loops only
Pattern:

Row 1. Chain 10 in BC. Drop BC. Join MC. Ch 26. (36 ch sts total)

Row 2. Using MC, sc in second ch from hook. Sc across to last MC ch. Sc half a stitch (i.e. don't complete the stitch with the last "yarn over and pull through"). Drop MC. Complete the stitch with the BC (i.e. the last yarn over and pull through). Sc to end using BC. Ch 1. Turn.

Row 3. Using BC, sc across in BLO to last BC st. Just like in Row 2, sc half a stitch in the last BC st. Drop BC. Complete the stitch using MC. Sc to end in BLO. Ch 1. Turn.

Row 4. Using MC, sc across in BLO to last MC st. Just like in Row 2, sc half a stitch in the last MC st. Drop MC. Complete the stitch using BC. Sc to end in BLO. Ch 1. Turn.

Repeat Rows 3-4 until you have 61 sc rows total. End with ch 1. (Note: check the hat at this point by wrapping it around your head. The ch row should touch the last sc row. You may need more or less rows to accomplish this. Make sure you end on an odd number of sc rows.)

Fold the piece in half so that the first ch row is next to the last row. Slip st together each st of the first row and the last row starting with the BC. When you get to the last BC st of the last sc row, sl st this using the MC. Continue using MC for the remainder of the hat. Ch 1 at the end.

Sc across the top of the piece in every other row. Do not join to ch st or first sc.

*Sc2tog in next 2 st, sc in next 2 sts. Repeat from * around until there are 12 sts left.

Sc2tog six times.

Fasten off. Weave yarn through last 6 stitches and pull tight to close the top of the hat. Weave in ends.

Monday, January 21, 2019

1800s Hat-Scarf (Crocheted Version)


Hi everyone!

I'm so excited this is finally done! I've been working on this since July 2018. I'm so happy with how it turned out after doing three versions of it.

I now introduce you to......the crocheted 1800s Hat-Scarf!


This is my version of a one-piece hat-scarf based on the hat-scarf worn by 19th century Frenchman Charles-Marie-Étienne Champion Dubois de Nansouty (image from Wikipedia). He was a military man turned mountaineer who lived from 1815-1895. I discovered his picture at an event hosted by the National Park Service in Maryland at the Monocacy Civil War Battlefield in Frederick. I immediately knew I had to recreate his hat-scarf.
Champion Dubois de Nansouty
The yarn I used is: 
Lion Brand Yarn Fishermen’s Wool, Natural (MC) – 2 skeins, 930 yds 
Lion Brand Yarn, Fishermen’s Wool, Brown Heather (CC) – 1 skein plus about 50 yds of a second skein, ~510 yds
...although any worsted/aran weight yarn would work. And you don't have to stripe it if you don't want to.
You can find the pattern at Ravelry and LoveKnitting. No more Craftsy. They recently changed how patterns are offered on their site and I did not make the cut. 
Cheers!

Wednesday, October 3, 2018

Two Pink Scarves

This Saturday, there will be a 5K walk/race by the Hurwitz Breast Cancer Fund in my town. As part of the event, the organizers requested pink scarves to be knitted, crocheted, or woven for walkers/racers who are breast cancer survivors. These are the two I made for them.

I started the pink and white one thinking I would do the interesting knot from the All Wrapped Up Infinity Scarf. The pink section is the pattern from the Pound of Love Hooded Baby Blanket. The white section is a granny square pattern from Heather's Crochet Blog. Unfortunately, I made the two sections too wide so the knot didn't work well. I just seamed the two together to make a HUGE infinity scarf. You have to wrap it around three times, but it still works well as a scarf.

The dark pink one is a fan or shell pattern that I haven't written up yet.

This brings my lifetime donation total to 689 items.

Cheers!


Thursday, August 9, 2018

Woodbridge Scarf

My first fingering weight crocheted scarf is now available! Everyone, meet my Woodbridge Scarf.


I see so many knitted fingering weight, elongated triangle scarves that I wondered why there aren't more crocheted ones. Well, I'm trying to fill that void. This is the first of many fingering weight crocheted scarves for me. I love this one so much. I love how it turned out and how the colors go so well together.

Here are the details about the scarf:

Yarn: Fingering weight

MC (brown) - A little more than 420 yds (I ran out of my first skein [of 420 yds] halfway through the final color block)
CCA (silver) - 400 yds (minimum, depending on your gauge)
CCB (green) - 400 yds (minimum, depending on your gauge)

I specifically used Shalimar Aerie yarn in colorways Waterchestnut (brown), Chandelier (silver), and Lean on Me (green).

Hook: E (3.5 mm)

If you would like to make a Woodbridge Scarf for yourself or a special someone, here is the link to the pattern on Ravelry: 

Ravelry Woodbridge Scarf Pattern

Craftsy Woodbridge Scarf Pattern


Cheers!


Sunday, January 7, 2018

Double Layer Waffle Hat


About 4 years ago, I made a prototype of a double layered waffle stitch hat. It went into a shelf, then I moved, then it went into another shelf...until today. I received a question from someone on Ravelry about my Waffle Stitch Hat early this morning. This question was the nudge I needed to finally get the prototype hat pattern written down. 

One of the issues I've always had with my Waffle Stitch Hat is that I feel like it doesn't stand up to wind well. Too many holes in the waffle stitch. This double layered hat is my answer to this problem.

Unlike my other free patterns, I will not be able to put this pattern on here. There are two images I have to help with two tricky parts of this pattern that aren't showing up well on this page. 

My pattern is available as a digital download on Ravelry and Craftsy

Cheers!

Saturday, January 28, 2017

A Second Pussy Hat Pattern


Hi all!

 Lately, I've been a little overwhelmed by the negativity coming from the eight-day-old administration. I made another pussy hat pattern to try to relax. Here's the pattern, using worsted weight yarn this time.

 Materials:
 Worsted weight yarn (less than 170 yds)
 H hook
 G hook
 Tapestry needle to weave in ends

 Abbreviations:
 Ch - chain
 Dc - double crochet
 Fpdc - front-post double crochet
 Bpdc - back-post double crochet

Pattern

Starting with a H hook...
1. Chain 38.

2. Dc in third chain from hook. Dc in each ch. When you reach the end (36 stitches), rotate the piece 180° and dc back across the bottom of the ch stitches you already dc-ed into. In total, you will have 72 stitches. Join to the first dc with a slip stitch. Ch 2. Do not turn. 


3. Dc into stitch slipped into from previous round. Dc in each stitch around. Join to the first stitch with a slip stitch. Ch 2. Do not turn.
Repeat step 3 until piece measures 6-6.5 inches long (approximately 12 additional rounds).

Switch to G hook...
4. *Fpdc, bpdc. Repeat from * around. Join to first fpdc with slip stitch. Ch 2. Do not turn.

5. Repeat previous round two more times. Do not chain at end. Break yarn. Secure yarn. Weave in ends.

I hear for the scientists march that brain hats will be accessory of choice. Stay tuned for a pattern for one of those!

Monday, September 29, 2014

So now that I have some free time....

....I thought I would write up a post about the crocheted pieces I entered in the Howard County and Maryland State Fairs in August. Here they are with links to the patterns if I can remember them:


Kiwi - 2nd at HoCo Fair, no placing at State
Red Hat - 1st at HoCo Fair, Honorable Mention at State
Scarf - 1st at HoCo Fair, 3rd at State
Purple Hat (my own design; one of these days I'll write up the pattern. I know I have a similar looking pattern already on this blog but it is not the same. This one is double-layered around the brim.) - 3rd at HoCo Fair in Original Design category; I did not enter this at State.


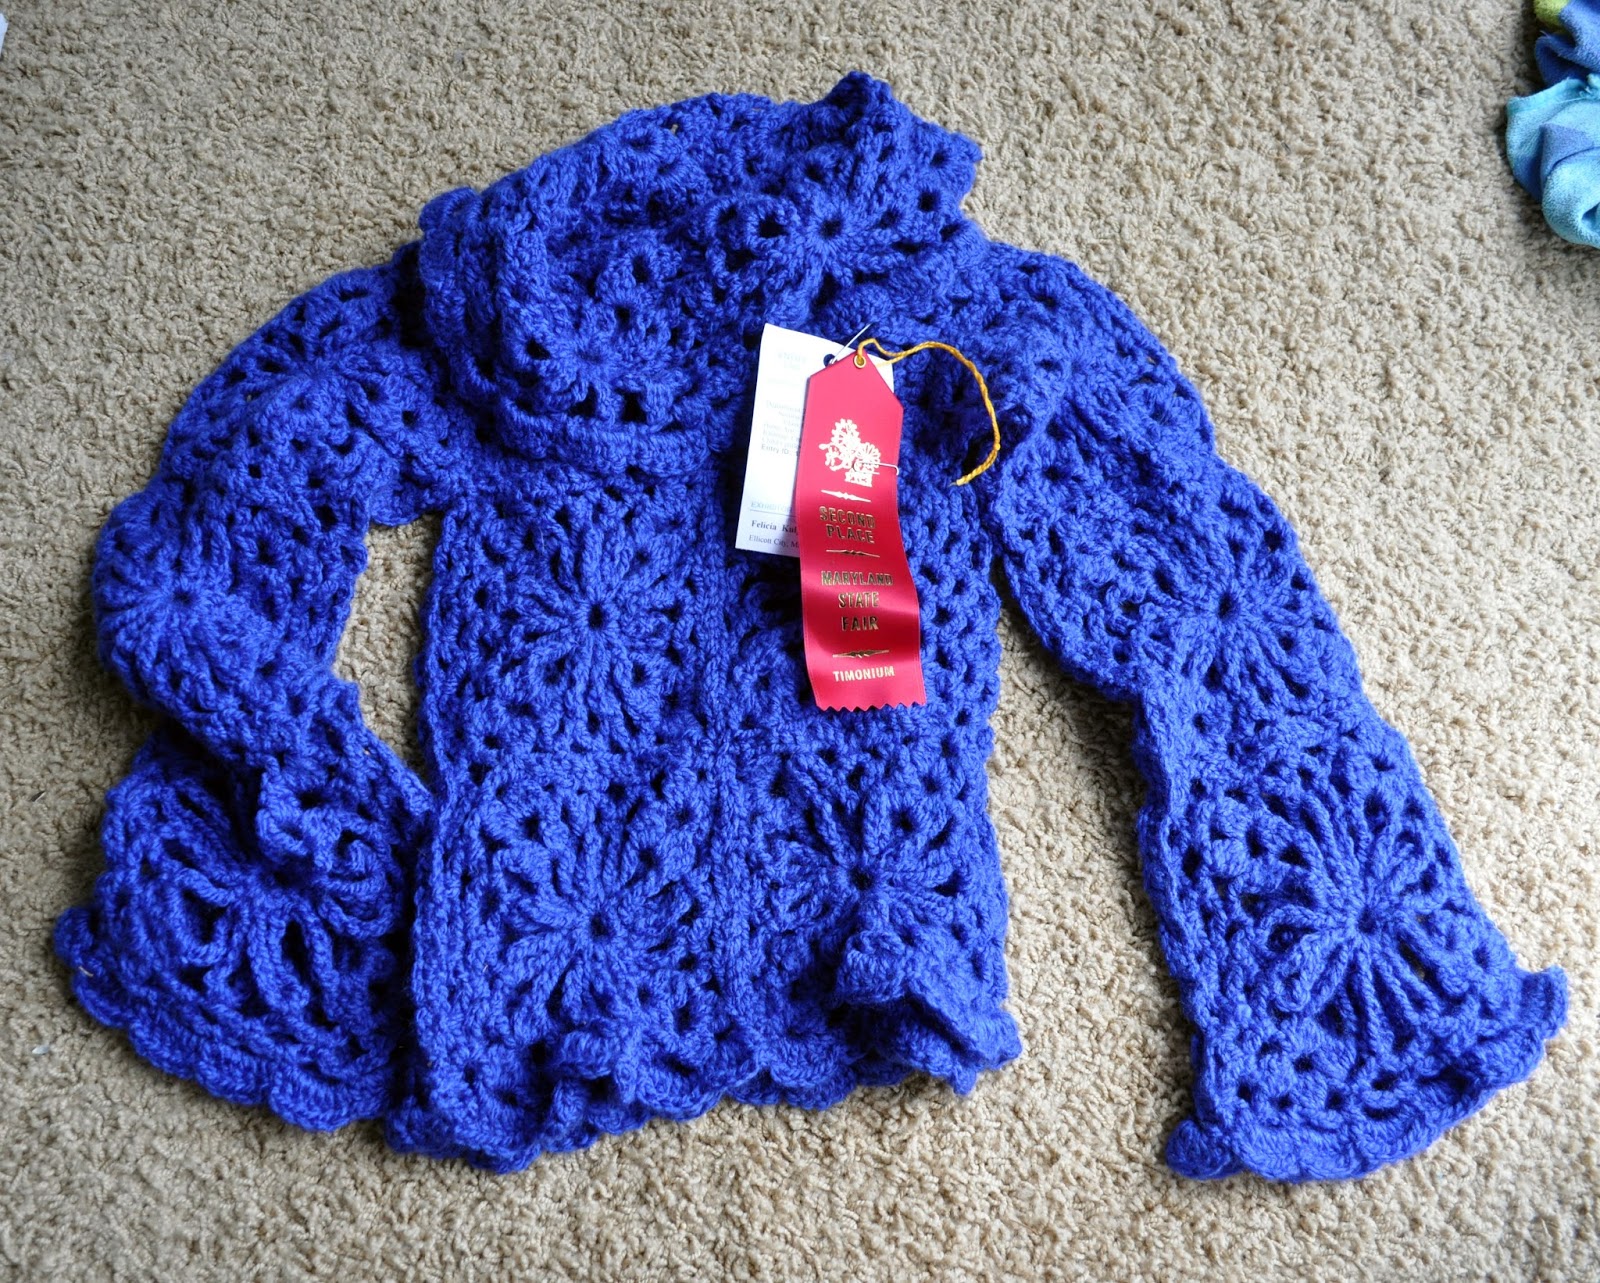
I entered this as a child's pullover. I followed this pattern from Lion Brand. I made the "small" size. However, when I sewed all of the squares together, I did it so tightly that an adult can't wear it. Anyway, it got 1st at HoCo Fair and 2nd at State.


For the shawl, I did what I like to do when I use Purl Essence Rainbow Boucle yarn: crochet two  skeins together. It makes a thicker fabric and gives an interesting striping effect.
Shawl - 1st at HoCo Fair, no placing at State. 
Frog backpack for a child: 1st at HoCo Fair, 1st at State.


This was the first time that I sewed a zipper into anything. I think it turned out alright. I'm still not sure what to do with it. That being said, I have a few friends who just had kids and we are all paleontologists so they might be interested in it.

Cheers!

Sunday, May 11, 2014

A post about a beard again...


So you all may remember a bit of a kerfuffle a few years ago about a woman who misused my beard pattern. This resulted in me taking it down for everyone. Well, now I have decided to start selling my pattern. Right now, it is only on Ravelry at this link: Warm Beard. I might add it to etsy after I get my thesis turned in, but it would still be for the same price.

Hopefully, I'm not making a mistake by doing this.

Cheers.


Sunday, May 5, 2013

447 and Kiva.org


So the semester has ended, except for a final I have to grade once I get back from Akron, OH, which means I get to send Jee Jee (ARC) all the items I've crocheted for her during the semester.

Items:
-5 pairs of socks
-1 hat
-2 earwarmers (one is very small)
-1 cowl
-13 scarves

Now my total is 447 items donated since 2009.

So now to some of my thoughts (if you aren't interested in my life as a grad student, you can skip down to the next section on Kiva.org):

An update on the NSF Graduate Research Fellowship: I didn't get it :D. I didn't want it since I don't want a PhD at this time and getting the NSF GRFP would have forced me into one. I'm still uncertain what I want to do in life. Now that I'm actually moving on my master thesis research (the reason why I'm in Akron), I feel better about paleontology. However, even though I'm enjoying it, I still can't see a future in paleontology for me. I think I still want to get a masters in chemistry and work in industry for a bit and then decide if it is something I want to continue with. A non sequitur, but I like teaching. I really enjoyed TAing GEO 404C Plate Tectonics and Earth History. In fact, I liked teaching more than I liked doing work for my thesis this semester. Meh. I guess we shall just let time tell...

Now to Kiva.org.

If you can't tell already (which actually you may not have been able to tell), I LOVE Kiva.org. To date, I've made 32 loans to 28 countries. Kiva is a microfinancing charity, in which lenders can loan as little as $25 to people all over the world (specifically in 64 countries). Usually, the people are in developing countries, although Kiva does have loans in the US. This is how the process works:


  • The borrower requests a small loan (from as low as $150 to as high as $6,500, although the US loans can be up to $10,000) from a micofinancing institution (MFI) in their home country.
  • The MFI disperses funds to the borrower and sends the loan information to Kiva, which then places the loan online.
  • Lenders (ordinary people, like you and me) from around the world lend as little as $25 to any of the 300 to 3,000 loans listed at any given time (there are usually just a few hundred around the 17th of each month and usually a few thousand around the 14-15th of each month for reasons I will explain later).
  • Your and my money is used to backfill the loan that has already been distributed to the borrower. This takes the risk of the loan off the MFI and onto you, which helps the MFI continue to provide more loans to be people who are looking to improve their qualities of life.
  • The borrower repays the loan as set by the schedule of the MFI. The money first goes to the MFI and then to Kiva and then to you.
  • The money arrives back in your account on the 15th of each month (everyone relends the money to new loans then so that's why there are so many listed prior to this date and so few after). You can relend the money to your heart's content or withdraw it.
  • Kiva costs nothing to sign up or to use ever (of course not including the money you lend). If you follow this link, http://www.kiva.org/invitedby/feliciakulp you (and me) can get a free $25 loan to a listed loan of your choosing (this money will be repaid to Kiva, not you or me).

Now I don't want to scare you with the "takes the risk of the loan off the MFI and onto you" part. I have never had a loan that ended with a loss. Although I have had a few loans that were delinquent (a late repayment), they always picked it up during the next month's repayment. Overall, lending on Kiva is very low risk and in the process, you are helping someone improve their life, help send their children to school, help expand their business so now they can hire additional employees and in turn improve their lives, and so on.

To help give you an idea of what your money can help do, here are some details about some of the loans that I have contributed to:


  • Countries: Bolivia, Burkina Faso, Chile, Ecuador, El Salvador, Georgia, Haiti, Honduras, Indonesia, Iraq, Kenya, Kyrgyzstan, Lebanon, Mali, Mexico, Mongolia, Nicaragua, Pakistan, Paraguay, Peru, Philippines, Sierra Leone, South Sudan, Tajikistan, Uganda, Ukraine, United States, and Zambia (28 total)
  • I've donated to women, men, groups of one gender, groups of both genders, married people, single people, old, young, widows, widowers, mothers, fathers, a Palestinian refugee
  • Some are taxi drivers or wives of taxi drivers, some work in motorcycle or car repair shops, some are farmers, some sell food and other general supplies, some are artisans and make clothes and jewelry, some wish to make improvements to their home or even just build one
  • To see a full list of my loans: http://www.kiva.org/lender/feliciakulp
  • Also if you are a Nerdfighter, the Kiva Nerdfighter team

Recently, I received an update from one of my loans (Made, Indonesia; jewelry artisan). Using the funds from the loan he requested, he has made the jewelry that has been listed on NOVICA and is available for purchase. Now, I'm not trying to promote him, but I am trying to give you the sense the the money that is lent to people through Kiva really does produce results and can true help their lives.

Peace.

Monday, August 1, 2011

Every Other Row Hat


With the Howard County Fair gearing up, I thought I would upload this hat pattern before my life gets really hectic, helping out at the fair. The bpdc increases used in this pattern can be a bit awkward to make. 

Pattern:

Materials:
Worsted weight yarn
K hook

Abbreviations:
Ch - Chain
Sl st - Slip stitch
St/Sts - Stitch(es)
Dc - Double crochet
Sc - Single crochet
Fpdc - Front post double crochet
Bpdc - Back post double crochet

Adult Size:
Ch 3 and join with sl st to form ring.
Rnd 1. Ch 2. Dc 12 into ring. Join to first dc with sl st. Join this way throughout.
Rnd 2. Ch 2. 2 fpdc in each st including the one slipped to. Join. Ch 2. (24 sts)
Rnd 3. Ch 2. *2 bpdc in first fpdc st, 1 bpdc in next fpdc st. Repeat from * around. Join. (36 sts)
Rnd 4. Ch 2. *2 fpdc in first bpdc st, 1 fpdc in next 2 bpdc sts. Repeat from * around. Join. (48 sts)
Rnd 5. Ch 2. *2 bpdc in first fpdc st, 1 bpdc in next 3 fpdc sts. Repeat from * around. Join. (60 sts)
Rnd 6-21. Alternate between one round of 1 fpdc in each st around and one round of 1 bpdc in each st around, starting with a Ch 2 for each round. Join the same way between rounds. End with a round of bpdc.
Rnd 22-24. Ch 1. Sc 1 in each st around. 
Fasten off. Weave in ends. 

New Born Size: (~4"diameter)
Ch 3 and join with sl st to form ring.
Rnd 1. Ch 2. Dc 12 into ring. Join to first dc with sl st. Join this way throughout. 
Rnd 2. Ch 2. Dc 2 into each dc around. Join. (24 dc)
Rnd 3. Ch 2. Fpdc in every st around. Join.
Rnd 4. Ch 2. Bpdc in every st around. Join.
Repeat rounds 3-4 until the had measures approximately 4" long. End with Rnd 4.
Brim rounds. Ch 1. Sc 1 in each st around. Join. Repeat this round one more time.
Fasten off. Weave in ends.

Baby Size: (~5.5" diameter)
Ch 3 and join with sl st to form ring.
Rnd 1. Ch 2. Dc 12 into ring. Join to first dc with sl st. Join this way throughout. 
Rnd 2. Ch 2. Dc 2 into each dc around. Join. (24 dc)
Rnd 3. Ch 2. *Dc 2 in the next st. Dc 1 in next st. Repeat from * around. Join. (36 dc)
Rnd 4. Ch 2. Fpdc in every st around. Join.
Rnd 5. Ch 2. Bpdc in every st around. Join.
Repeat rounds 4-5 until the had measures approximately 4.5" long. End with Rnd 5.
Brim rounds. Ch 1. Sc 1 in each st around. Join. Repeat this round one more time.
Fasten off. Weave in ends.

Teen/Adult Small Size: (~6" internal diameter)
Ch 3 and join with sl st to form ring.
Rnd 1. Ch 2. Dc 12 into ring. Join to first dc with sl st. Join this way throughout.
Rnd 2. Ch 2. 2 fpdc in each st including the one slipped to. Join. Ch 2. (24 sts)
Rnd 3. Ch 2. *2 bpdc in first fpdc st, 1 bpdc in next fpdc st. Repeat from * around. Join. (36 sts)
Rnd 4. Ch 2. *2 fpdc in first bpdc st, 1 fpdc in next 2 bpdc sts. Repeat from * around. Join. (48 sts)
Rnd 5. Ch 2. Bpdc in each st around. Join.
Rnd 6. Ch 2. Fpdc in each st around. Join.
Repeat rounds 5 and 6 until hat measures 5.5" long. End on Rnd 5.
Brim rounds. Ch 1. Sc 1 in each st around. Repeat this 3 times.
Fasten off. Weave in ends. 

Sunday, May 15, 2011

Requests for the Beard Pattern

I have received several requests for the beard pattern, through comments on this blog, convos on Etsy, and messages in Ravelry. I have not replied to any of them, mostly because it is the end of the semester and I've just been too busy studying for 4 chemistry and geology finals in addition to squaring away my internship at the Smithsonian in DC this summer.

I am still upset about the listings of my beard on Etsy. One of the sellers promptly removed her listing upon my request, which I am happy about. However, even after repeated requests for the removal of the listings by the other seller, nothing has been done. This only confirms my sentiments about this seller, that he/she has little ethical standards for the items he/she sells.

I do not know what I'm going to do at this point about the beard pattern. I feel so betrayed that I honestly don't want anyone to have the pattern. As of right, I will not give the pattern out to anyone.

Thursday, August 19, 2010

Cluster Stitch Scarf and Accompanying Hat


Every year, I enter items in the Home Arts Building at the Howard County Fair. This year, I had made the Cluster Stitch Hat (see the comments below for a current url for the hat pattern), but in order to enter it in the fair, I needed an accompanying scarf. So I decided to make my own pattern. It worked out pretty well considering it won first in Scarf and Hat Set, Adult Crochet. It will be at the Maryland State Fair in a week. (Update: Neither the hat nor the scarf placed at the MD State Fair. There was a lot of competition.)

Scarf Pattern:

Materials:
3 skeins of worsted yarn (about 510 yds)
Large-eye blunt needle to weave in ends
I hook (I know the hat pattern calls for a J hook. For some reason, I used an I hook for the hat and the scarf. Feel free to use the J hook, and in fact I recommend it for the hat at any rate, since I can barely get mine over my head. Just keep in mind that a J hook will make the scarf a little wider.)

Stitch Explanation:
CS (cluster stitch) - (yarn over (YO), insert hook in next slip st, YO and pull up 1/2" loop) twice, YO and draw through all 5 loops on hook, ch 1. CS made. 

Important Note: For CS on all rows after the first row using CS, instead of inserting the hook in the next slip st, insert the hook from front to back and back out to front around the CS of the previous row. Treat these CS as if they are post stitches around the previous row's CS.

1. Ch 21.
2. Sc in second ch from hook. Sc across. Turn. Do not ch 1.
3. Sl st across in each sc. Ch 1. Turn.
4. Sc in the two loops facing front (i.e. the loops of the sc sts) across.
5. Repeat steps 3 and 4 two more times.
6. Repeat step 3, but end with ch 2.
7. Going through the two loops facing front, dc 1 in first st, CS 1 in next st, skip next st, CS 1 in next st, skip next st, CS 1 in next st, dc 1 in next 6 sts, CS 1 in next st, skip next st, CS 1 in next st, skip next st, CS 1 in next st, skip next st, dc 1 in next two sts. Do not ch. Turn. Sl st across in the top of each st and around each ch st. Ch 2. Turn.
8. Repeat step 7 twice, but use 6 hdc sts instead of the 6 dc sts in the middle. Follow the pattern of using dc in one row followed by two rows using hdc. This prevents the middle section from bulging and keeps it more even with the rest of the row. Continue until scarf is 1" from desired length. Ch 1 instead of 2 in last row.
9. Sc 20 st evenly across. Do not ch. Turn.
10. Repeat step 3 and 4 three times. Do not ch 1 in last row. Finish off. (Note: you could do one more row of step 3 before finishing off. I didn't, but now that I look at my scarf, I think it would look better with one more row of step 3.)

If there are problems with this pattern, please comment and I will try to fix it.

Thursday, August 12, 2010

Ribbed Winter Hat


I love making this pattern. It is so easy and makes an extremely warm, winter hat. Also, the pattern can be easily altered to make a different sized hat or to spice things up and add stripes. 

I like to make this hat using worsted weight yarn and a K hook (but sometimes super bulky yarn with an M hook). However, depending on the yarn, sometimes the top of the hat (i.e. from step 6 on) becomes rather open between stitches. If this occurs, switch to a smaller hook, like an I or H.

Stitch Explanation (from Lion Brand Yarn):
sc2tog (sc 2 sts together) - Insert hook into st and draw up a loop. Insert hook into next st and draw up a loop. Yarn over, draw through all 3 loops on hook - 1 st decreased.

Pattern (Adult):

Worsted Weight Yarn Hat
1. Chain 36.
2. Sc in second ch from hook. Sc across. Ch 1. Turn.
3. Sc across in back loops only. Ch 1. Turn.
4. Repeat step 3 until you have 60 rows total. End with ch 1.
5. Fold the piece in half so that the first row is next to the last row. Slip st together each st of the first row and the last row. Ch 1 at the end.
6. Sc across the top of the piece in every other row. Do not join to ch st or first sc.
7. *Sc in next 2 st, sc2tog in next st, repeat from * around until there are 12 st left.
8. Sc2tog six times.
9. Fasten off. Weave yarn through last 6 stitches and pull tight to close the top of the hat. Weave in ends.


Super Bulky Yarn Hat
Pattern Using Super Bulky Yarn (Adult):
Use an M hook. Follow the pattern for the worsted yarn hat, but use 21 sts in the base chain and about 41 rows total.

Pattern (Newborn [the orange one]):

1. Using a K hook, chain 26.
2. Sc in second ch from hook. Sc across. Ch 1. Turn.
3. Sc across in back loops only. Ch 1. Turn.
4. Repeat step 3 until you have 37 rows total. End with ch 1.
5. Fold the piece in half so that the first row is next to the last row. Sl st together each st of the first row and the last row. Ch 1 at the end.
6. Switch to an H hook. Sc across the top of the piece in every other row. Do not join to ch st or first sc.
7. Sc around until you are back to the seam. Do not decrease or join. (I'm not sure what this round accomplishes, but that is how I did it.)
8. *Sc in next 3 st, sc2tog in next st, repeat from * until you are back to the seam.
9. *Sc in next 2 st, sc2tog in next st, rep from * until you are back to the seam.
10. *Sc in next 1 st, sc2tog in next st, rep from * until you are back to the seam. At this point, you can fasten off and finish this hat like the adult hat, or you can proceed to the loops.
12. From the last completed sc, ch 20. Sl st into next sc. Do this around in every sc.
Fasten off. Weave yarn through last round of stitches and pull tight to close the top of the hat. Weave in ends.

For all hats, roll up the bottom until it no longer covers the eyes when worn.


Hope they keep you warm in winter :)