Showing posts with label free pattern. Show all posts
Showing posts with label free pattern. Show all posts
Sunday, October 25, 2020


Thursday, July 30, 2020
Sunday, April 26, 2020
Friday, April 24, 2020
Saturday, April 11, 2020
Sunday, March 29, 2020
Sunday, October 6, 2019
Baby Gifts for my Friend's Baby Shower
I haven't posted anything in a while, because you know, life.
But I just finished some crocheted baby items I'm going to give to my friend at her baby shower next weekend.
Here they are:
 A Newborn Sorting Hat (although I think it might fit a 3-month-old with my gauge). My friend REALLY likes Harry Potter, so I thought it would be a cool thing to make for her.
 A Fox Hat and Diaper Cover for a 6-month-old. The pattern originally called for it be a bear hat, but my friend's nursery theme is woodland creatures. I know bears live in woods, but I like foxes more than bears. I changed the hat pattern a bit, because as written, the hat pattern is worked flat then seemed. I hate making hats that way.
To make the hat in the round, I make the white brim flat then seemed the two ends together to make a wide tube. I started the first row of orange around the top of the tube then joined and turned when the pattern said to only turn. The second row of orange was worked from the inside of the hat. If you choose to make this hat this way, it will be best to count your stitches as you go so that you don't stitch into the joining stitch, and therefore, increase your stitch count.
I added pointy ears instead of round ones called for in the pattern. I also added the orange snout and nose.
Sorry about the poor image quality. I took these pictures with my phone. I think I need to clean the case it's in.
Cheers!
But I just finished some crocheted baby items I'm going to give to my friend at her baby shower next weekend.
Here they are:


To make the hat in the round, I make the white brim flat then seemed the two ends together to make a wide tube. I started the first row of orange around the top of the tube then joined and turned when the pattern said to only turn. The second row of orange was worked from the inside of the hat. If you choose to make this hat this way, it will be best to count your stitches as you go so that you don't stitch into the joining stitch, and therefore, increase your stitch count.
I added pointy ears instead of round ones called for in the pattern. I also added the orange snout and nose.
Sorry about the poor image quality. I took these pictures with my phone. I think I need to clean the case it's in.
Cheers!
Saturday, June 22, 2019
Sunday, March 31, 2019
Basketweave Hat
 |
Materials:
- Worsted weight yarn (170-200 yds) - 1 or 2 colors if you would like the brim to be a different color than the main hat
- H hook
- G hook
Abbreviations:
- ch - chain
- dc - double crochet
- sl st - slip stitch
- st/sts - stitch(es)
- fpdc - front post double crochet
- bpdc - back post double crochet
 |
Main Hat
H hook
- Ch 3. 9 dc into third ch from hook. Join with a sl st to first dc. Join like this throughout (join with sl st to first stitch in the round). (You can start this round with a magic ring instead of the ch 3 if you would like.)
- Ch 2. *Bpdc, fpdc in same stitch. Repeat from * around. Join. (18 sts)
- Ch 2. *Fpdc in next st. Bpdc, fpdc in same next stitch. Repeat from * around. Join. (27 sts)
- Ch 2. *Bpdc in next st. Fpdc in next st. Bpdc, fpdc in same next st. Repeat from * around. Join. (36 sts)
- Ch 2. *Fpdc in next st. Bpdc in next st. Fpdc in next st. Bpdc, fpdc in same next st. Repeat from * around. Join. (45 sts)
- Ch 2. *[Bpdc in next st. Fpdc in next st.] twice. Bpdc, fpdc in same next st. Repeat from * around. Join. (54 sts)
- Ch 2. *[Fpdc in next st. Bpdc in next st.] twice. Fpdc in next st. Bpdc, fpdc in same next st. Repeat from * around. Join. (63 sts)
- Ch 2. *[Bpdc in next st. Fpdc in next st.] three times. Bpdc, fpdc in same next st. Repeat from * around. Join. (72 sts)
- Ch 2. [Fpdc in next st. Bpdc in next st.] around. Join.
- Ch 2. [Bpdc in next st. Fpdc in next st.] around. Join.
- Repeat rounds 10 and 11 until hat is as long as you need it to be. 6-7 inches from the top of the hat is a good length. The brim will add about 1 inch to the length of the finished hat.
- Cut main hat color and switch to brim color, if applicable.
Switch to G hook.
- Ch 1. Fpdc in the fpdc sts, bpdc in the bpdc sts around. Join.
- Repeat round 1 two more times.
- Cut brim color yarn. Secure and weave in ends.
Sunday, February 17, 2019
Two Tone Ribbed Winter Hat Pattern and Tutorial

Materials:
- Worsted weight yarn
- K hook (However, depending on the yarn, sometimes the top of the hat [the part in the round] becomes rather open between stitches. If this occurs, switch to a smaller hook, like an I or H.)
The video below is probably the best way to work this pattern. If you would like an accompanying written pattern, it is below the video.
Feel free to let me know if anything is not clear. I don't mind revisiting the content of the video or the written pattern to clarify things.
Link to Ravelry
Link to Ravelry
Abbreviations:
- Ch - chain
- Sc - single crochet
- st/sts - stitch/stitches
- sc2tog - single crochet 2 together
- BC - brim color
- MC - main color
- BLO - back loops only
Row 2. Using MC, sc in second ch from hook. Sc across to last MC ch. Sc half a stitch (i.e. don't complete the stitch with the last "yarn over and pull through"). Drop MC. Complete the stitch with the BC (i.e. the last yarn over and pull through). Sc to end using BC. Ch 1. Turn.
Row 3. Using BC, sc across in BLO to last BC st. Just like in Row 2, sc half a stitch in the last BC st. Drop BC. Complete the stitch using MC. Sc to end in BLO. Ch 1. Turn.
Row 4. Using MC, sc across in BLO to last MC st. Just like in Row 2, sc half a stitch in the last MC st. Drop MC. Complete the stitch using BC. Sc to end in BLO. Ch 1. Turn.
Repeat Rows 3-4 until you have 61 sc rows total. End with ch 1. (Note: check the hat at this point by wrapping it around your head. The ch row should touch the last sc row. You may need more or less rows to accomplish this. Make sure you end on an odd number of sc rows.)
Fold the piece in half so that the first ch row is next to the last row. Slip st together each st of the first row and the last row starting with the BC. When you get to the last BC st of the last sc row, sl st this using the MC. Continue using MC for the remainder of the hat. Ch 1 at the end.
Sc across the top of the piece in every other row. Do not join to ch st or first sc.
*Sc2tog in next 2 st, sc in next 2 sts. Repeat from * around until there are 12 sts left.
Sc2tog six times.
Fasten off. Weave yarn through last 6 stitches and pull tight to close the top of the hat. Weave in ends.
Monday, January 21, 2019
Sunday, December 23, 2018
Gather at the Pyramid Knit Hat Pattern Review
Hi all!
It's been a while since my last video. I have a new one up today. It's a review of the Gather at the Pyramid knitted hat pattern.
You can find the free pattern here: https://www.ravelry.com/patterns/library/gather-at-the-pyramid .
It's been a while since my last video. I have a new one up today. It's a review of the Gather at the Pyramid knitted hat pattern.
You can find the free pattern here: https://www.ravelry.com/patterns/library/gather-at-the-pyramid .
Cheers!
Wednesday, October 3, 2018
Two Pink Scarves
This Saturday, there will be a 5K walk/race by the Hurwitz Breast Cancer Fund in my town. As part of the event, the organizers requested pink scarves to be knitted, crocheted, or woven for walkers/racers who are breast cancer survivors. These are the two I made for them.
 I started the pink and white one thinking I would do the interesting knot from the All Wrapped Up Infinity Scarf. The pink section is the pattern from the Pound of Love Hooded Baby Blanket. The white section is a granny square pattern from Heather's Crochet Blog. Unfortunately, I made the two sections too wide so the knot didn't work well. I just seamed the two together to make a HUGE infinity scarf. You have to wrap it around three times, but it still works well as a scarf.
The dark pink one is a fan or shell pattern that I haven't written up yet.
This brings my lifetime donation total to 689 items.
Cheers!


The dark pink one is a fan or shell pattern that I haven't written up yet.
This brings my lifetime donation total to 689 items.
Cheers!

Sunday, August 5, 2018
Rilee's Hat Knitted Pattern Review
Hi all!
I have a new video up. It's a review of the Rilee's Hat knitted hat pattern.
You can find the free pattern here: https://www.ravelry.com/patterns/library/rilees-hat-2
Cheers!
I have a new video up. It's a review of the Rilee's Hat knitted hat pattern.
You can find the free pattern here: https://www.ravelry.com/patterns/library/rilees-hat-2
Sunday, January 14, 2018
Copy.Cat C.C (Colorado Chick) Beanie

I modified the pattern somewhat. I originally started out making a different hat, but abandoned that one. Here's what I did:

I think it turned out nice. :)
Sunday, January 7, 2018
Saturday, January 28, 2017
Sunday, January 22, 2017
Saturday, January 21, 2017
Monday, September 29, 2014
So now that I have some free time....
....I thought I would write up a post about the crocheted pieces I entered in the Howard County and Maryland State Fairs in August. Here they are with links to the patterns if I can remember them:



Kiwi - 2nd at HoCo Fair, no placing at State
Red Hat - 1st at HoCo Fair, Honorable Mention at State
Scarf - 1st at HoCo Fair, 3rd at State
Purple Hat (my own design; one of these days I'll write up the pattern. I know I have a similar looking pattern already on this blog but it is not the same. This one is double-layered around the brim.) - 3rd at HoCo Fair in Original Design category; I did not enter this at State.
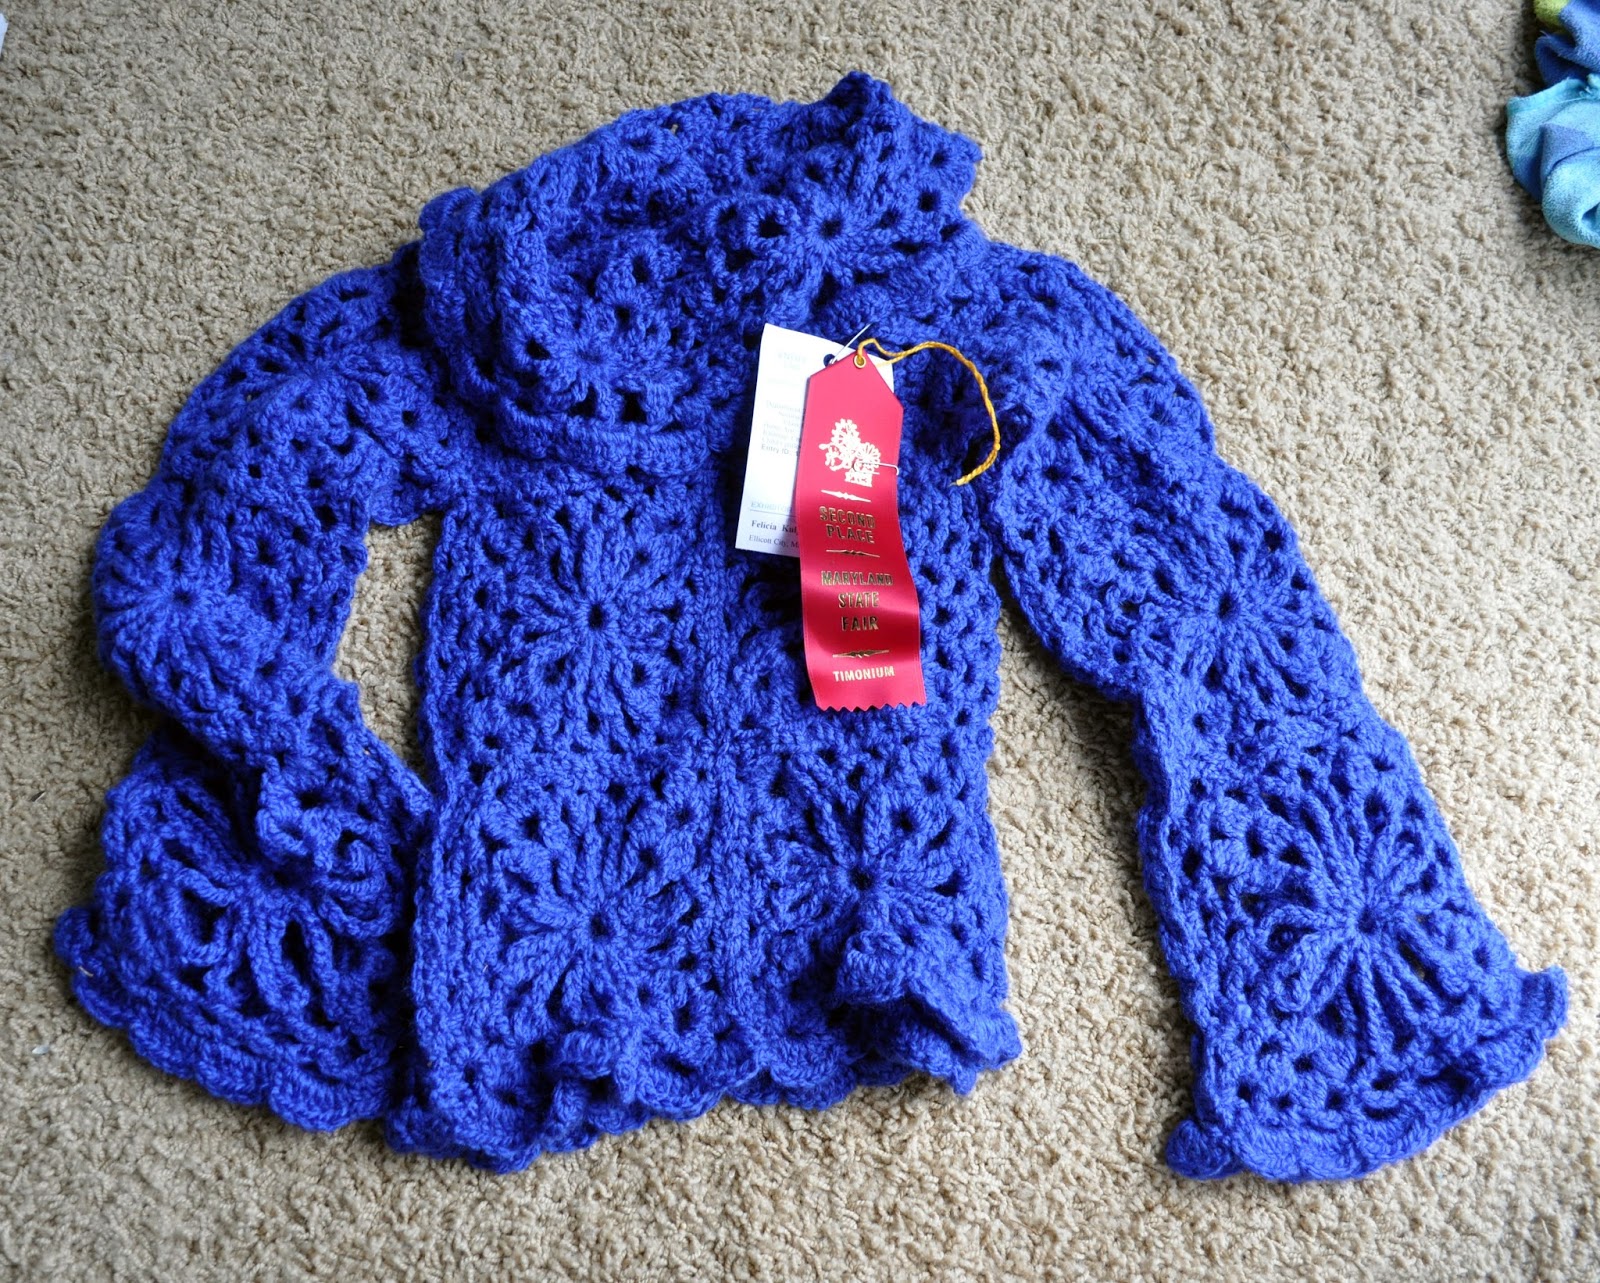
I entered this as a child's pullover. I followed this pattern from Lion Brand. I made the "small" size. However, when I sewed all of the squares together, I did it so tightly that an adult can't wear it. Anyway, it got 1st at HoCo Fair and 2nd at State.
For the shawl, I did what I like to do when I use Purl Essence Rainbow Boucle yarn: crochet two skeins together. It makes a thicker fabric and gives an interesting striping effect.
Shawl - 1st at HoCo Fair, no placing at State.
Frog backpack for a child: 1st at HoCo Fair, 1st at State.
This was the first time that I sewed a zipper into anything. I think it turned out alright. I'm still not sure what to do with it. That being said, I have a few friends who just had kids and we are all paleontologists so they might be interested in it.
Cheers!
Subscribe to:
Posts (Atom)